What is Nandroid Backup
NANDroid Backup (or more popularly known as Nandroid Backup) is a digital backup of all the data stored in the device’s NAND (flash) memory. But that went way too much technical. Let’s keep that jargon aside. In simpler terms. a Nandroid Backup is a complete backup of your entire Internal Storage. These include everything, from important system files and data to minuscule files like wallpapers and ringtones.
Why Create a Nandroid Backup
One of the best assets of the Android OS is its open-source nature. Owning to it, there are endless possibilities available to tweak your device’s software. Rooting your device, installing a custom recovery, magisk modules, Xposed Framework, etc all these functions are available right at your fingertips. But as Murphy’s law has clearly stated- “Anything that can go wrong will go wrong“. And quite frankly there is no escaping this statement. There is always a chance of some issues arising out of rooting your device, flashing a mod, etc, especially if you are new to this. So it is always recommended to have a Nandroid Backup of your Android device- right after installing a Custom Recovery like TWRP. Never do the mistake of flashing a custom ROM, rooting your device via Magisk or modifying the boot images and then creating a Nandroid backup. It altogether destroys the sole purpose of this backup. With that said, head over to the next section for the instructions on how to create and restore a Nandroid Backup via TWRP. But before that, make sure to go through the below “Prerequisites” points.
Prerequisites
Any custom recovery could only be installed once the device’s bootloader is unlocked. Head over to this section to know how to Unlock the Bootloader of any Android Device (refer here for Pixel Devices).Next, a custom recovery is required. Without a second thought, go for TWRP Recovery. Download the official version from the TWRP website. If no official version exists, download an unofficial one- but only from XDA.
Setting up the Custom Recovery
Before starting the guide on how to create and restore a Nandroid Backup via TWRP, you need to install a custom recovery like TWRP. I have already created a detailed step by step guide for downloading and installing the said recovery. However, if you have a little bit of knowledge on all these, then you may instead refer to the “short guide” below:
Creating a Nandroid backup via TWRP
In order to start the guide on how to create and restore a Nandroid backup via TWRP, you need to boot your device to TWRP Recovery. Either Google for the hardware key combination, or use the universal method below:
Connect your device to PC. Make sure USB Debugging is turned on.Open PowerShell window in the same way as mentioned above.Type the below code to boot your device to TWRP Recovery:adb reboot recovery
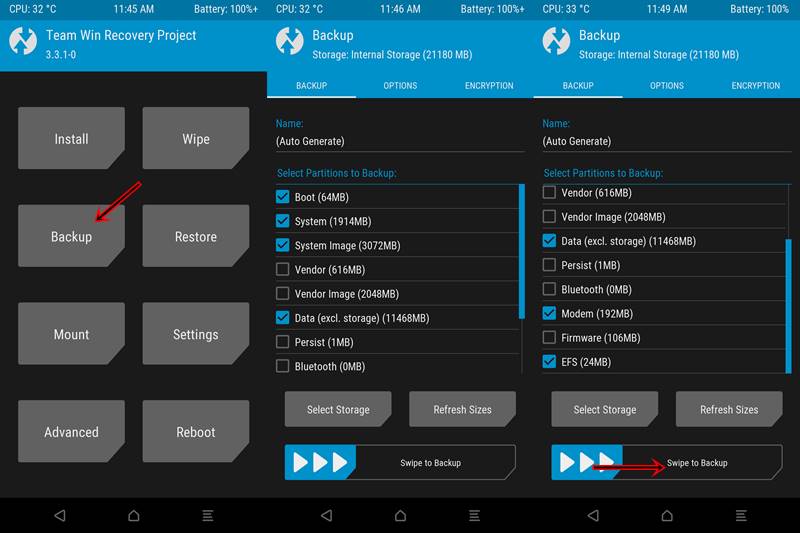
Now let us begin with the process:
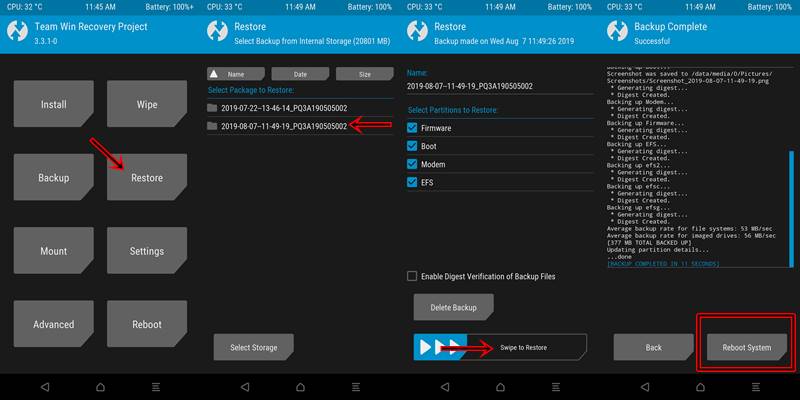
If ever you brick your device big time, then rather than downloading a heavy stock firmware, just restore the Nandroid backup and you are good to go. Follow the steps mentioned in the next section for the same.
How to Restore a Nandroid Backup via TWRP Recovery
With that, we come to the end of the guide on how to Create and Restore a Nandroid backup via TWRP Recovery. If you didn’t understand any part of this guide, do let me know. Happy Droiding!
About Chief Editor

